....... an exquisite boutique for that something special


Showing posts with label My tutorials. Show all posts

Tuesday, July 22, 2014

Large Paperclips

This tutorial has been featured on Spoonful.com

You will find the tutorial HERE

People have asked me where to purchase the Jumbo Paperclips.

If you are wanting to know where you can purchase the Jumbo paperclips to make my Felt Flower Paperclip Tutorial

Go to Smiggle website

They are .50cents AUD each.  

I hope this helps

Friday, November 1, 2013

Exciting news!

Its exciting news for me!

I received an email recently from freesewing.com. I was asked if they could put my Quick and Easy Purse on their website... what a compliment! Thanks Free Sewing.

You can view it HERE a website well worth a visit. You will find lots of inpsiration there.

Have a great weekend


Monday, August 13, 2012

Android / Iphone Case Tutorial


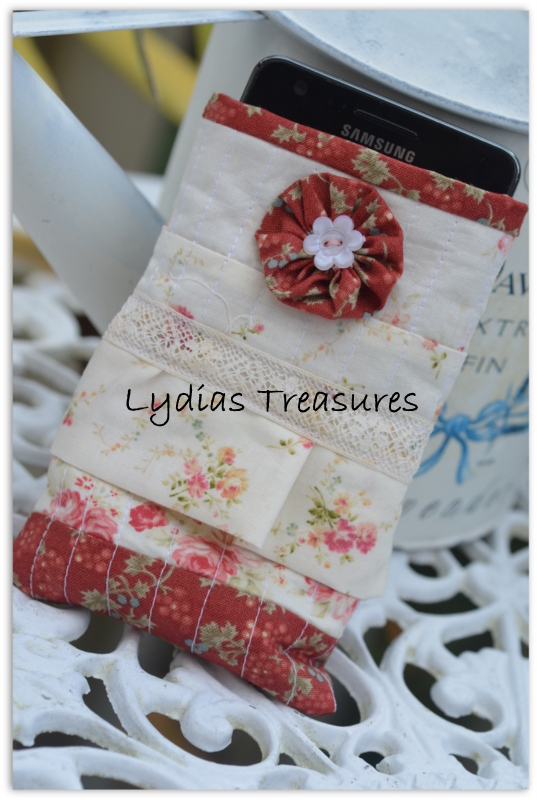
As promised here is the Android Phone CaseTutorial

This could also fit an Ipod with some space to move or an Iphone

Requirements:

5 strips of fabrics cut 1 1/2 in x 7 1/4in
1 strip for the frill 2in x 14in
Pellon  -  7in x 5 1/2 in
Inside fabric - 71/4 in x 6 in
Lace or braid to embellish
Cut fabric strips

Place the top piece of fabric right side facing on to the pellon.
Place the second strip right sides together on top of the top strip of fabric. 
Sew through all layers joining the strips and pellon.
Sew on the bottom edge of the strip fabric.
Continue in this method all the way down the pellon.
This is the Quilt As You Go Method.

Top completed


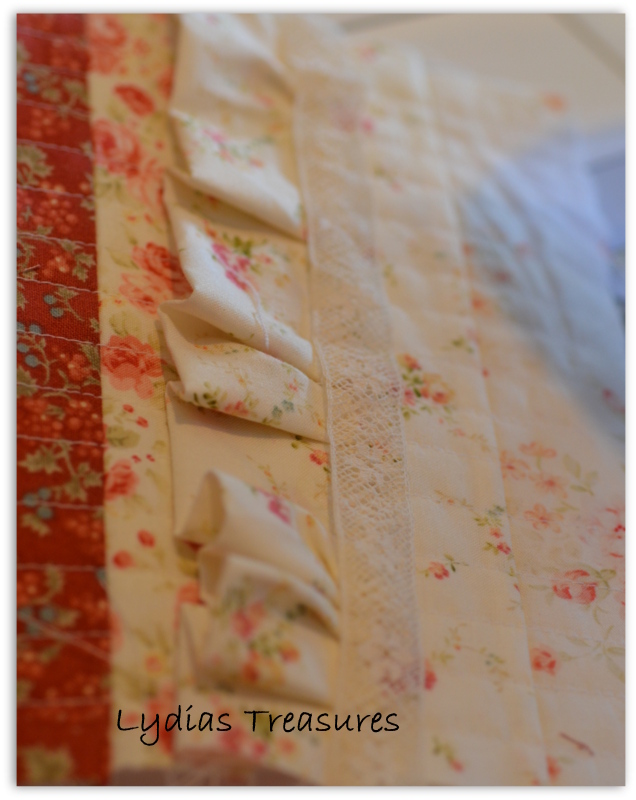
Fold the frill fabric in half.
Press
Using gathering stitch on your machine to gather fabric
Pin to the right side of the Phone Case. As shown in the photo.
Sew

To cover up the stitching sew lace or braid on to the top of the frill

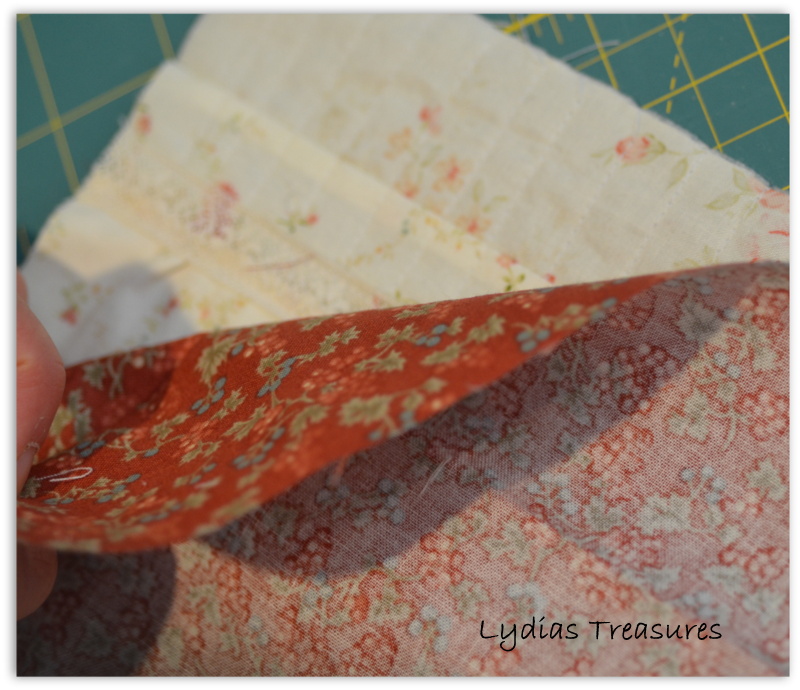
To sew the inner of the Phone Case.
Place fabric right sides together
Stitch along the top of the Phone Case joining the inner fabric to the top.


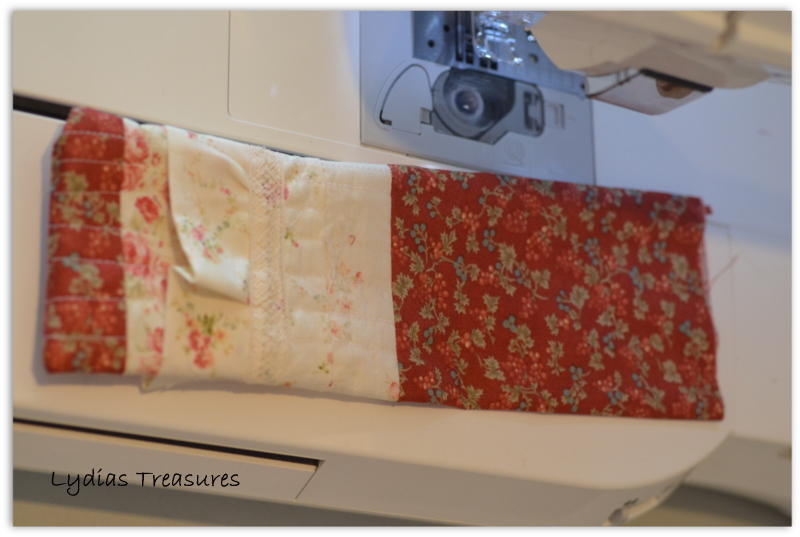
 Fold the whole thing in half as pictured above.
Leaving the top of the inner fabric open so you can fold it out.
 Turn out to look as the photo.
Press.


 Press the edged inwards as pictured
Then stitch closed.
Put the inner inside the case and press.

Embellish with a yoyo if you would like

You Phone Case is finished!

(I hope these instructions make sense)

Happy sewing


Tuesday, June 19, 2012

Covered Notebook Tutorial


You will need:
A notebook
Craft Glue
Wadding
Fabric
Embellishments such as yoyo's, felt, lace etc


Cut the wadding to the size of the whole notebook opened, cover to cover

Glue the front cover of the notebook and press the wadding onto it.

Do the same for the back as pictured above

Cut the fabric slightly larger than the notebook allowing you to fold the fabric over

Cut the corners and the centre of the fabric on the diagonal. Fold over as pictured. Make sure you glue around the edges before folding. Dont use alot of glue
Now is the time to embellish the front with the lace, if that is what you want to do. As you have to have the edged fold over to the inside of the cover as the fabric... the below picture show how to cover up the untidiness of this. If you are going to use a yoyo skip this step.

Glue the front page and the back page as pictured above to the front and back cover of the notebook. 
This will cover up the folded fabric edges

You have completed your notebook... now time to embellish it.

For this notebook I used some lace and some daisies. 
on the below notebook I used a yoyo with a felt base.


Washi Tape Pegs Tutorial

Washi Tape Peg Tutorial

You will need:
Spring Pegs
White Paint
Paintbrush
Washi Tape
Felt for the Felt Rose, flower or whatever decoration you choose to use.

Paint the pegs and wait for them to day.

Stick the washi tape to the inside of the peg as shown in the photo

Press along the outside of the peg, making sure the tape is centre.
Cut the washi tape a little longer

Stick it to the inside of the peg


Decorate with a felt rose, flower or whatever type of decoration you desire.

Enjoy!!

Monday, April 16, 2012

Humbug Bag Tutorial


Humbug Bag Tutorial


Requirements:An Outer fabric - 17" x 12"An Inner fabric - 17" x 12"
Pellon - 17" x 12"
Contrast fabric for the binding and tabs - Binding cut to 2 1/2" wide x 12"
Tabs cut 2 1/2" wide by your desired length
Zip 13" or 35cm

NOTE: You can change the size of the bag by changing the zipper size and the length and depth of the fabric

Sandwich the three layers together
Do some freemotion quilting to attach them together

Iron binding over

Attached binding by folding over the raw edge of the 12" sides
The middle of the binding sits flush on the raw edge.
Sew the binding on with one sewing line

Then attached the zip.
Pin the zip to the inside fabric as shown above. Make sure the zip is unzipped right to the bottom, it is alot easier to attach it this way.... this is not done in the above photo.

Sew the zip on one side then on  the other, as shown above.... this photo is looking at the zip from the inside.

Do up the zip and turn inside out.  Pin the bottom of the bag, adding the tab in by the bottom of the zip.
Sew the bottom of the bag right sides together. Cut the excess zip off once you have done this.

Now sew the other end of the bag.. this time vertical so it looks like the photo below. Be sure to add the other tab to the top of the bag as shown in the photo.

Now your bag is finished.

More examples of this bag:
Made with Tilda fabrics and Tilda Wool Felt for the tassel heart

Made with Tanya Whelan fabric

The Quick Easy Purse Tutorial


Im doing some housekeeping... just moving my tutorials around.
So please bear with me as I repost these... 


The Quick Easy Purse Tutorial


Requirements

4 x 7" squares
Iron on pellon
button
dome (if desired)

Click HERE for template. This is a PDF template or pattern piece

4 x 7" squares


With right sides together sew two of the square together (The two fabrics for the front) then sew the other two together (These are the two fabrics for the inside of the purse)


Cut corners as per the pattern at one end. This will be the front flap of the purse. The inside and the front fabrics.

Press
Then cut out a piece of iron on pellon and iron to the wrong side of the fabric. I iron this onto the front fabric piece.(On the wrong side)

Put the right sides of front and back pieces together. Sew all the way around. Start at the bottom, where the corners are not cut. Leave a gap where there is no sewing so your can turn the purse in the right way. The is the top of the inside of the purse.You can either add a binding over the unsewn edge (above) or sew it up and add lace or braid. The instructions below are for the binding option


Cut a piece of fabric 8" x 2"

Fold in the end edges


Sew on to the top edge, right sides together, turn over then sew down, as you would if you were binding a quilt.

Then fold over as per the pattern piece instructions. The purse is folded into thirds. I used the largest buttonhole stitch on my sewing machine to sew both the sides together. Looks very effective.

Add a dome on the inside and a button on the front or do a button hole and add a self covered button.


All finished

Happy Sewing


Related Posts Plugin for WordPress, Blogger...