....... an exquisite boutique for that something special


Showing posts with label Christmas. Show all posts

Friday, November 30, 2012

Christmas Angel


Yesterday I went into a shop that had lots of bits and bobs in it for creating.
I have been on the look out for some wooden beads to make an angel idea that I had.

Well, I found them. Last night out came the wire, beads and felt and I got creating this cute little angel for the Christmas Tree.


and the other day I posted a Shabby Chic Christmas Decoration I made with Modge Podge.
I made another one.

This is created using Modge Podge, braid, folded roses and pearls. This matches the other decoration I made.  

I was asked a few weeks ago if I would take another craft class. This class is going to be something quick and easy for Christmas. We have come up with an idea. I will show the finished product when it is completed.

PLEASE NOTE: REGARDING THE GIVEAWAY FOR THE FAT QUARTER. I have not received one notification of anyone signing up for the newsletter and I know people have. I have deleted the giveaway until my website designer sorts out the problem. I am rather distressed about this... so sorry.. those of you who left a comment on the giveaway I will email you personally to notify you. 


Tuesday, November 13, 2012

Im on a creative roll ....

Last night I was sitting in my studio with my hubby having a cup of tea.
I saw some earrings I had made a few years back, some angels wings and and some inspiration come over me. I got up and said to my husband "I just have to make something". Out came the wire, beads, fabric and away I went. The little angel above is the creation. 
She is made with a Tilda fabric from the Flowergarden range and I am in love. :-)

Also, I have been on a Modge Podge binge lately. Having made the Christmas Deocration below and another one too, which I havnt taken a photo of and this little gift bag above. This is a little bag and on it I have used a lovely Shabby Chic tissue paper, Tilda Paper Craft papers from the Flowergarden series, Riley Blake mini pom poms and some gorgeous pink and white gingham ribbon (from France) - I just had to add that in, as I love things from other countries, other than China. I have made the folded ribbon roses from the link in my tutorial tab.

I have also been very inspired by Pinterest... this site is so inpsiring.
I spend time on there every day finding tutorials and inspiration.

The above photo is of some clay tags I have made for Christmas. At this present time I cannot find the link for the tutorial. I will tell you have I made them.

Instructions:
White clay - air dry clay is what I used.
A crochet doily
Rolling Pin
Cutters.

Roll out a handful of clay. Place the doily over the top of the clay and roll. This will press an imprint into the clay. Now using the cutter of your choice cut out the shapes. I used a snowflake, heart and star cookie cutter. I used a small birthday candle to make the holes for the string to go through.
Leave to dry.

So everyone, this is my very creative week.


Have a great day


Thursday, November 8, 2012

Shabby Chic Christmas Decoration

Today I was really keen to get into doing some craft where I could get my hands dirty.

Out came the Modge Podge and off I went to the local Spotlight.

I purchased some Paper Mache products and got creative.

Folded Roses on the top.... pearls dropping from the bottom.

I so enjoyed making this today!

Hugs


Friday, August 24, 2012

Christmas Quilt in the making

This is my new quilt at the designing stages.

When I did my class with Lynette Anderson a few weeks ago I was inspired. I learnt newish techniques or better techniques for what I love to do. I am always drawing and doodling. As you know I have put up a few free stitchery designs at different times. 

I felt challenged in myself to create my own Christmas quilt design using Lynette's new fabrics for Christmas called Christmas Fun fabrics. The hurdle I was finding hard to jump over was that these are fabrics designed by a designer and she uses them in her own designs. I could not get my head around trying to do something of my own with her fabrics. Lynette mentioned in class that she had come across someone in blogland that had created a tablerunner using Lynette's fabrics.. it was like a light went on in my head and I thought.... I am going to give this ago.

So I came home and got drawing.

The above stitchery blocks is what I have come up with.... I am thinking of doing a log cabin type of block for each stitchery. I have had so much fun doing the applique and stitching. 

Writing the pattern is the hard part! 

Have a good weekend

Lisa - Lydia's Treasures


Friday, May 4, 2012

My Forte'

My Forte' is Embroidery/Stitchery.
I have been doing this craft for 36 years.... 
I was sent a linen cushion cover from England when I was a little girl
That was my first piece of work to complete. I learnt all different types of stitches.

The above ribbon embroidery is a creation I am in the process of making.
It is a Christmas Stocking meant to be finished last year... oh well, there is always this year LOL!

The fabric is an old piece of green satin from the 60's

The lace is hand dyed, the ribbons are gorgous silk Mokuba from Japan.

I used to teach embroidery.
I ran classes for around 7 years or so from my home.

I love stitching and embellishing. 
I was commissioned to embroidery a bride dress with silk ribbon and shoes to match.
It was alot of work but a compliment to be asked to do.
I have added velvet leaves to this design.
I will also be adding other embroidery stitches and crystals along the way.

Also...

One of the classes I taught was was
painting a water colour design on to fabric then embellishing with embroidery
This was one class that we really enjoyed doing.
This is an embroidered tea cosy.
The stitch used it like a blanket stitch knitted onto the needle.
Very easy and very effective done with wool.
A closer look.
I love this leaf stitch. I use it on alot of things....fly stitch it is called.

And my needlebook, I mentioned in the below post.
this is one of my designs... maybe up and coming in my new little shop.
I am a fan of crystals and silk. I love pretty things.
This is a photo of a pincushion I made a while back.
It is scented with gorgeous crystals on each corner.... and of course the dressmakers pins.

Have a great day.


Friday, November 18, 2011

Cake Pops and......

Well Im on a creative roll at the moment and I have to 'strike as the iron's hot' so the saying goes
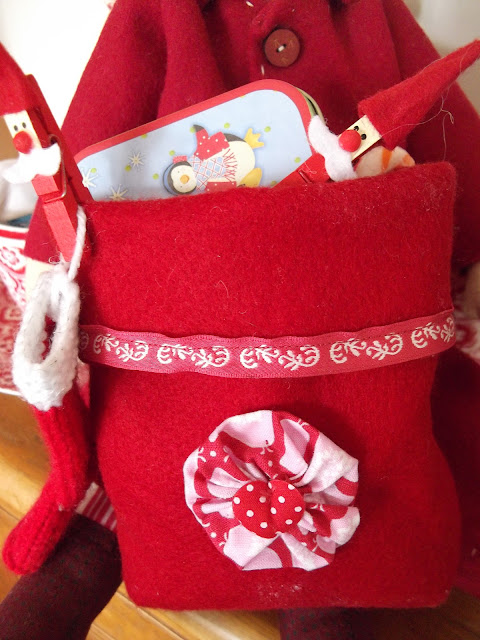
I was so excited about the inspiration I got yesterday with these little Santa Sacks I had to make some more.
They are all made from felt and I have used Tilda fabrics and braids

White 
Pink... and the red one I made yesterday of course...
I am a lover of red, white and pink together, hence the reason these are all in those colours.
Im off to buy some larger felt pieces today to make some more.

The Tutorial for the Felt Santa Sacks is in the below post.. or go to the sidebar and click on the photo.


Also I love cake decorating.. if you follow me on Pinterest you will see this.
I just love decorating for parties and making things extra special.
I had to have a go at these Cake Pops.

A White Christmas Tree

and my favorite Christmas Puds... I just love these cuties...


Have a great weekend


Thursday, November 17, 2011

Felt Santa Sack Tutorial

I have been in my sewing room today trying to find inspiration for christmas gifts.
I was ramaging through my box of felt and came up with an idea for a santa sack. 
So while I was sewing it up I took photos so I could give you the following tutorial.

Decide on the size of the bag which you would like to make by folding your felt in half. Make sure the length is long enough for you to turn the top over.

Sewing with right sides together
Fold the felt making sure the seam is in the middle.. this is the back of the bag

Sew across the bottom of the bag

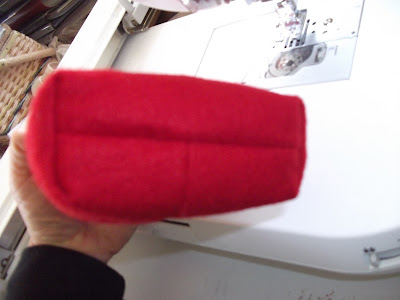
Fold the bottom corner of the bag as pictured.. this is the inside seam at the bottom. Do this to both corners

As picture... the corners are sewn up

\
This is what the bottom of the sack looks like when folded out right.

Sew some braid around the inside of the sack. So when it is turned over it shows on the right side.
I used some Tilda Christmas Fabric to make the yoyo.. Tilda heart and Tilda braid for the cuff of the sack

Your sack is finished

I hope you make some of these .. they are QUICK AND EASY... thats my motto!..

Add some stitichery to the front.. I promise these are coming.
 I have drawn up some cute gingerbread houses.

Also

I have started a BOM I purchased last year from The Fat Quarter Shop
Block ONE completed! LOL  finally


Hugs to all


Friday, October 28, 2011

Tilda Sew Along Doll Part 4 and other things

Well ladies....
I have had a busy week. 
I am involved in a Christmas Challenge on the weekend. This challenge involves me teaching one of the activities. Cookies iced with royal icing. I have been baking and decorating samples.. 

So the Tilda Doll is on a go slow.


Face....
Use a water proof marker. Mark with a pencil where you want the eyes to go.

Use the black marker to mark eyes

Get a blush and small eye shadow brush

I start in the middle of the cheek ...  with a circular motion I move it around so that the blush fades out
Do this with both cheeks

DONE

Now

Cut out the panaloons
Skirt
and petticoat

Cut out the wings

Sew the braid and the lace to the pantaloons and skirt piece
\
Next week we will finish the skirt, pants and dress her 

Just to prove that I have been busy
A candy cane Christmas Tree ... A lovely centre piece for Christmas
I found this tutorial online.. I will have to put the link up when I have a spare 5 mins to search for it.


Eatible glitter on the candy canes and the icing

Samples

To be iced for samples

Have a great weekend


Related Posts Plugin for WordPress, Blogger...