....... an exquisite boutique for that something special


Showing posts with label Tilda Doll. Show all posts

Tuesday, September 10, 2013

Tilda Santa with Drum

This is made using a Tilda kit
I loved sewing with the Tilda skin fabric.. it is soft and has a slight stretch to it, very different to using a linen or calico. 
This Tilda Santa was not too hard to make.. The only thing I would recommend is getting some of the turning tools for stuffing and turning the arms and legs. This does make the job so much easier. Using a stick or a knitting needle makes it a very fiddly job.

I have been wanting to make this doll for quite sometime. He was partially made and I hadnt got around to finshing him off. What amazed me with the Tilda kit was it had all the cottons for hand sewing in it and each colour had its own sewing needle. 

Happy Sewing


Wednesday, July 10, 2013

Useful Tools

I realised why my Tilda Doll was in the too hard basket!
I lost my hemostat tool months ago and I really do not like trying to turn the doll arms etc without it.

Well, my hubby found it the other day!  I am celebrating.. so I will now get onto making my doll.
I highly recommend this tool for turning out doll parts.
I found some HERE  at the Cloth Doll Supply shop.
They come in three different sizes.

I highly recommend them. In the Tilda Doll Kits there is a kebab type stick in it for turning out the doll. This works but it makes the job very fiddly. 

Also, I new tool I came across at a Lynette Anderson class a couple of weeks ago.

Apliquick Tool
Click HERE to visit their Facebook page
This tool is amazing to use with a bit of Rosanne Fabric glue your applique will never be the same.

Lynette and I with the class sample

Handstitched piecing... Yes.. Lynette handstitches hers.. and I can see why! 


Making progress with my block...  Using Lynette's new Christmas Fabrics

Lynette at work

Those tools are amazing!! All done with glue Applquick and then the stitching

Not pressed yet... but Im happy with it.

Have a great day.


Saturday, April 13, 2013

Tilda Ballerina Sew Along

Would like to make a Tilda doll?

Starting on the 8th May 2013 I will be starting a Sew Along
We are going to make the ballerina.

You will need:
The Tilda's Fairytale Wonderland Book
Skin fabric... Linen or a good quality cotton will be fine if you cannot get Tilda skin
Faric for your Ballerina Dress
Ribbon of your choice
Embroidery Yarn
A small brooch or beads or something similar
Stuffing for your doll
and wire

In the book is the requirements for the hair. I will show you how to do this.

If you would like to take part and have your blog on the sidebar as a participant please comment on this post. 
I will post a tutorial each week over a period of 3 - 4 weeks
At the end of this you should have your doll completed for all of us to see.

Hugs


Tuesday, March 27, 2012

Tilda Bunny Sew Along Part 2

 Make sure all sewn pieces are pressed
Stuff the head firm but not tight firm to the neck
Fold the ears  in half to find the middle. Use a pin to mark.  Place the centre of the ears where the seam is...see photo above. Hand sew the ears to the head. I did not do this neatly as they will not be seen.


Stuff the rest of the body


Now stuff the legs and arms. As you can see in the photo, I use a doctors tool to stuff my dolls
You can use a skewer or knitting needle but this is fiddly.


Fold the bottom of the body as shown.
Place the leg as hard up to the side seam of the body as you can get.
Pin through all layers


 This is how it should look


Sewing on the arms is the same as the doll. 
Fold the edges inwards. The will form a flat edge, as shown in the photo. Pin

Sew from the top in small stitches so they cannot be seen as per the photo.
Sew all around the arm... Do not sew too tightly under the arm, as the arm will have no mobility

Sew the legs in. I stitched each leg right around... then I sewed the middle up from one leg to another.

Your Bunny is all ready to dress.

Next week we will dress our bunnies.

As you know mine is finished. I will show you how to show the hat. The book does not explain how to do it that well. Its not hard when you see it in a photo.

Happy sewing 


Thursday, March 22, 2012

My Tilda Bunny

I finished my bunny today
I wanted to show you the finished creation so maybe I could inspire some more of my readers to take part.
Im very happy with this little one.
I have used Tilda fabrics except for the body, that is made from linen.
The ric rac is Tilda, the button on the hat is Tilda also.


I had so much fun making this.
It only took me a few hours. 
Not very time consuming at all.

I am having another sewing flurry
so I have to strike while the iron is hot, as the saying goes.

Happy creating


Thursday, November 10, 2011

Some of the Sew Along Dolls


 I have received two emails from ladies that participated in the Sew Along Tilda Doll.
The above photo is of Wendys doll.
I just love the fabrics she has chosen. Also, Wendy has made a different dress for her angel. This dress is in the same book.
A full length photo... isnt she lovely.

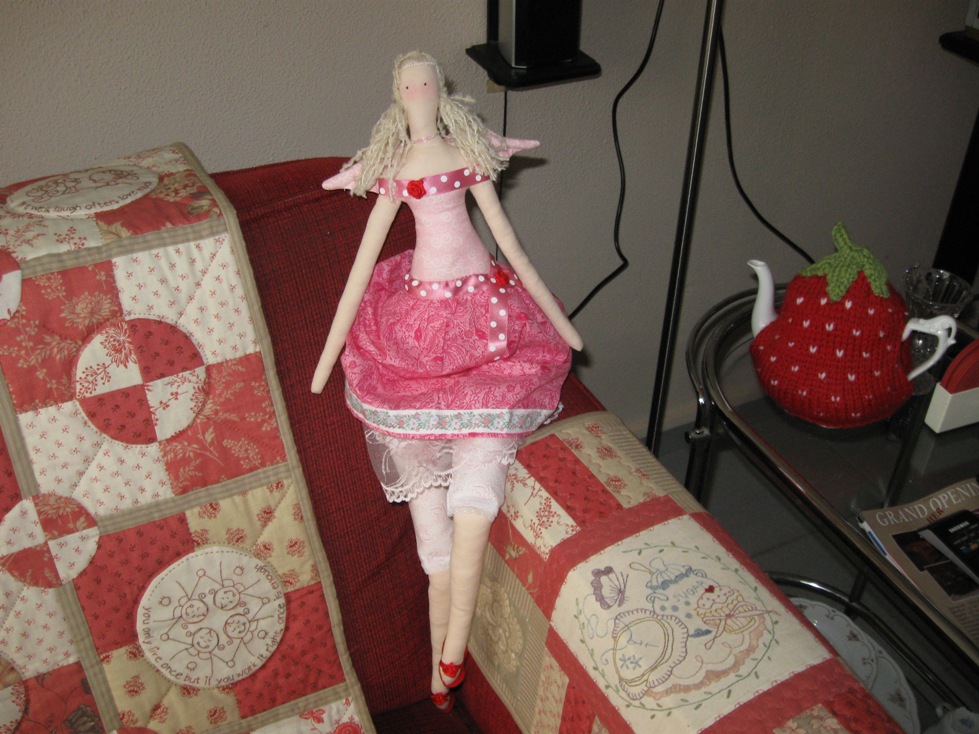
And  Anita from Holland took part too.
This is her Tilda Angel.
Dont you just love those quilts in the background... look at the stitchery!! 

I am waiting on photos to be emailed from the other participants. 

Thanks to those who took part.
It was alot of fun.

I am working on some free stitchery patterns for Christmas. Will have them up soon.

Hugs to all


Tuesday, November 1, 2011

Tilda Sew Along Part 5

Well ladies... my angel is finished!! She is adorable in my eyes! 

Below is the final stage of the Sew Along. 

Sew the two layers of fabric together to form a tube.
Fold over the raw edge and do a gather stitch on your machine.


Gather up

 Sew the pantaloons
Right sides together to make them look like the photo above

Sew the inside seam

Put them on your doll.
Fold over top edge and pin down.
Hand sew them to the doll so they do not come off

Put skirt on your doll
Gather in as much as you can
Pin to the doll
Hand sew the skirt to the doll

Trace wings onto the fabric


Sew through the double thickness leaving the largest round edge
of the wing open


Turn in the right way
Stuff slightly then sew the lines as shown above

Turn the open seam inside the wing
I handstitched them onto the back of the angel gathering them in.
I liked the finished look this gave.. but it is up to you if you want to finish the wings this way

The back of my angel

Now to embellish.
I LOVE embellishing and finishing the things I create.


I made here some little shoes.
These are made with felt on the sole of her foot and a ribbon rose for the top.

Click HERE to take a look at another Tilda doll I made. This gives more of an idea of how to make them. They are very simple and effective.

I added a rosebud to the top right of her dress and off course some ribbon and the crown. I purchased the crown from Puddlecrafts in the UK. Click HERE to visit their website

A closer look


I have really enjoyed putting this Sew Along together.. 
Thank you for taking part.
I would LOVE to see some photos. Please email them to me so I can show them on my blog.
I hope you enjoyed it and have learnt something.

I hope to do another in the future... Maybe not a doll but something else

Have a great week


Friday, October 28, 2011

Tilda Sew Along Doll Part 4 and other things

Well ladies....
I have had a busy week. 
I am involved in a Christmas Challenge on the weekend. This challenge involves me teaching one of the activities. Cookies iced with royal icing. I have been baking and decorating samples.. 

So the Tilda Doll is on a go slow.


Face....
Use a water proof marker. Mark with a pencil where you want the eyes to go.

Use the black marker to mark eyes

Get a blush and small eye shadow brush

I start in the middle of the cheek ...  with a circular motion I move it around so that the blush fades out
Do this with both cheeks

DONE

Now

Cut out the panaloons
Skirt
and petticoat

Cut out the wings

Sew the braid and the lace to the pantaloons and skirt piece
\
Next week we will finish the skirt, pants and dress her 

Just to prove that I have been busy
A candy cane Christmas Tree ... A lovely centre piece for Christmas
I found this tutorial online.. I will have to put the link up when I have a spare 5 mins to search for it.


Eatible glitter on the candy canes and the icing

Samples

To be iced for samples

Have a great weekend


Related Posts Plugin for WordPress, Blogger...